Home
>
Handibot Forum
>
Topic
Plate and cut location dimensions
Posted by deagan492
|
Plate and cut location dimensions April 06, 2015 10:37PM | Posts: 9 |
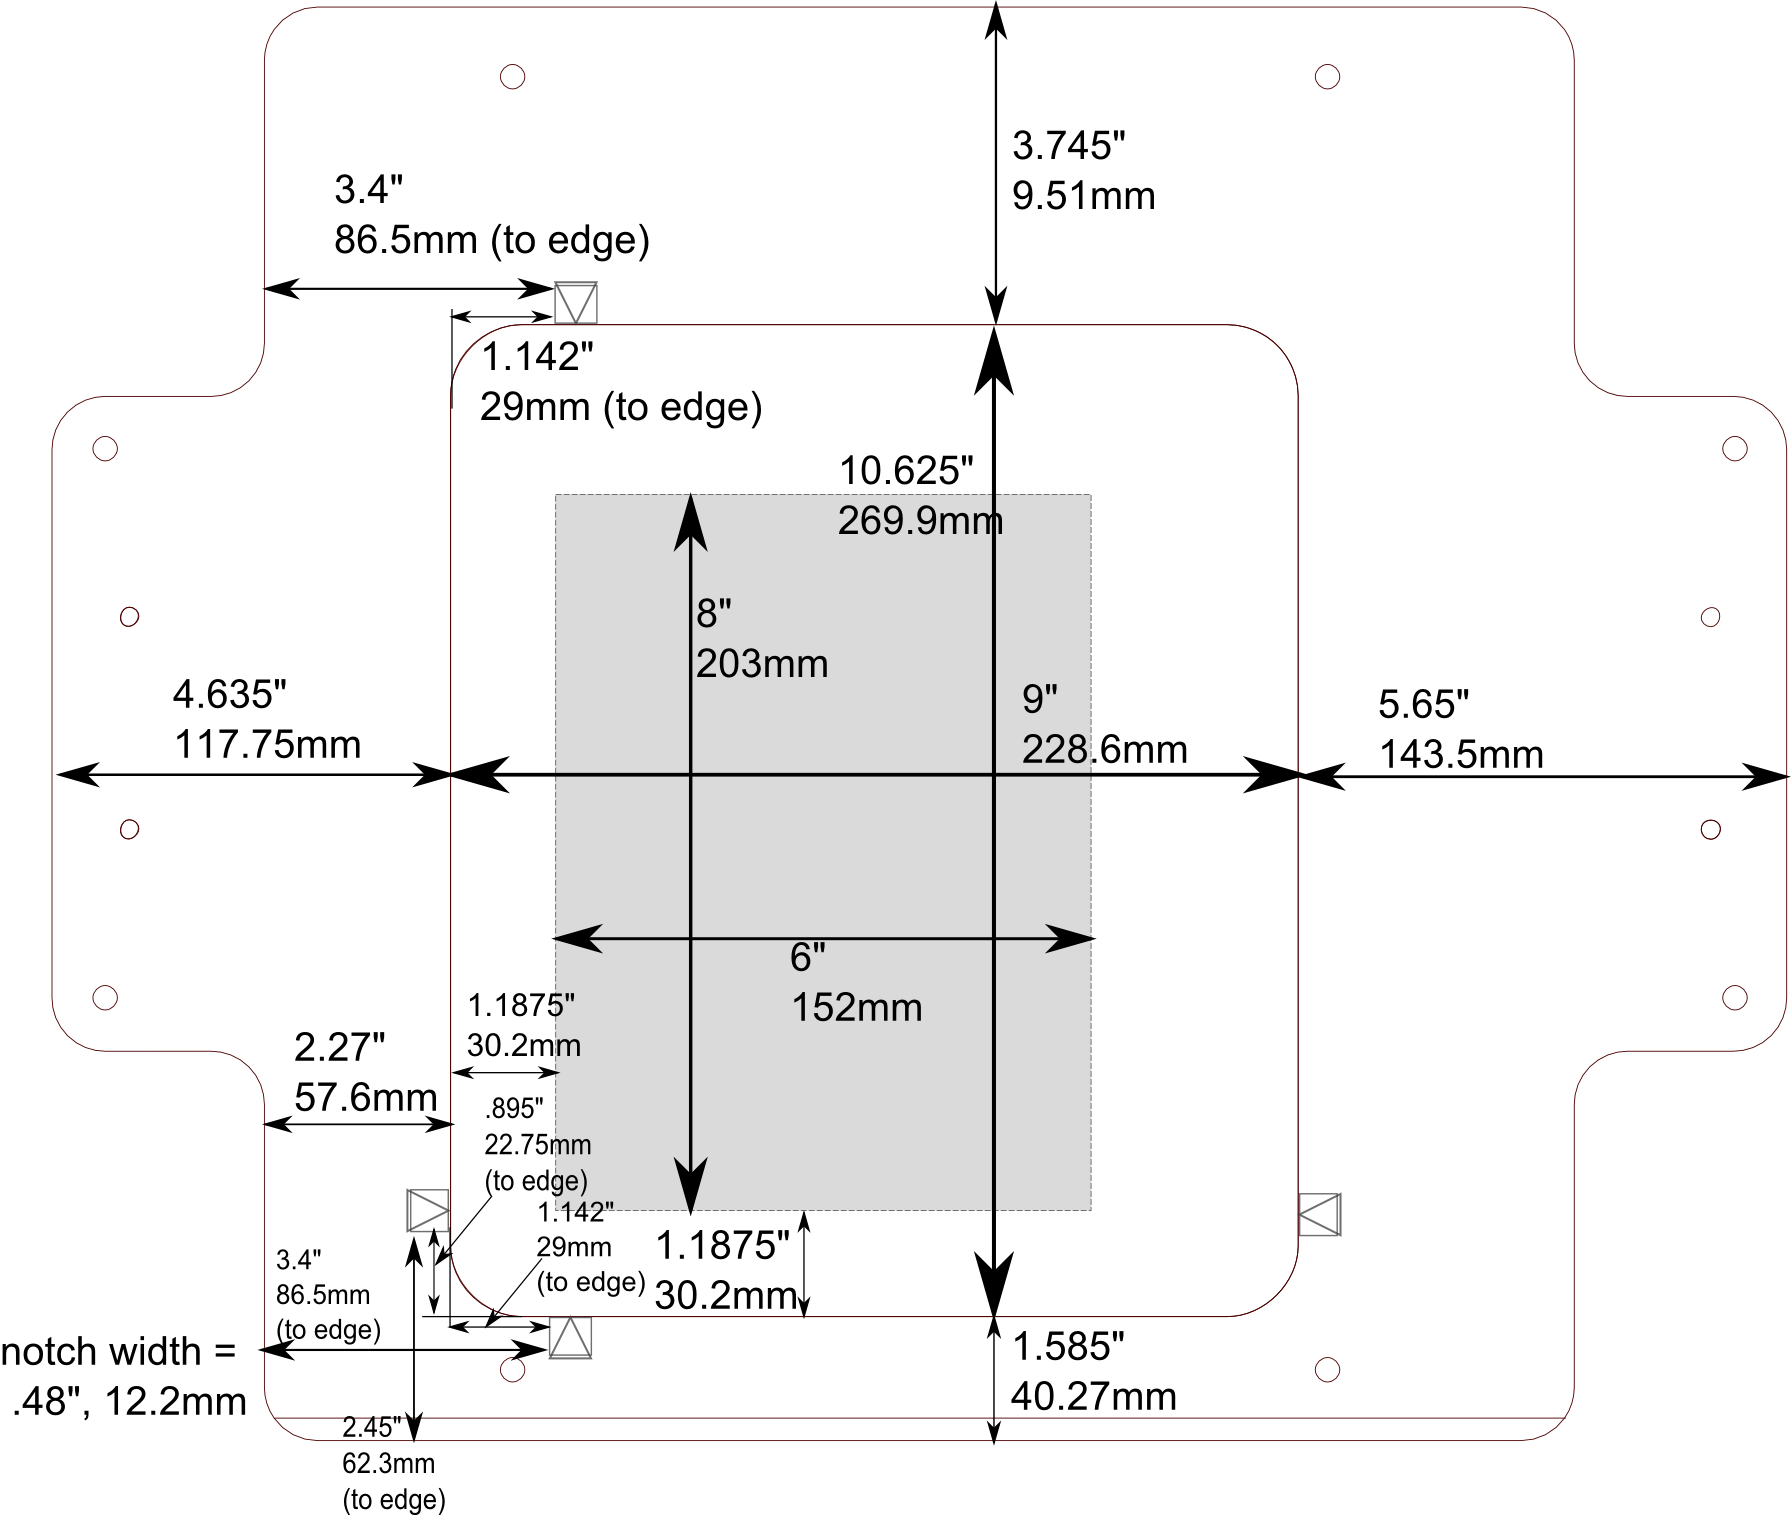
I'm trying to figure out how to position my Handibot V1.1 to have the cut space be where I want it to. I did a bunch of measurements tonight and none of them ended with intuitive values.
I was surprised that the point of the notches carved at the top and bottom of the Y axis (representing a value on the X axis) was not aligned with where the 'bot was cutting X=0 (I tested a cut with a 1/32" ball nose mill). X=0 does seem to line up closely to the near edge, not the point. On the other axis (Y=0) it seems to line up with the point.
The following is not perfect to scale (sorry, it's not clear how to shrink the image, link at http://slamdanz.com/images/cutlocation.png, SVG to edit at http://slamdanz.com/images/cutlocation.svg) but the measurements are the best I could do with a 6" caliper and rulers. I grabbed the base plate from the sketchup models so it's a little out of date.
Is this similar to what others see?
Am I measuring from un-useful locations?
What values, from what points do you use to position the handibot?
|
Re: Plate and cut location dimensions April 07, 2015 09:39AM | Admin Posts: 622 |
To get an exact match to these notches, you might want to adjust your X and Y zero offsets. These settings can be found under "Shopbot Setup" in the "Tools" menu of the control software. Clicking next three times in the dialog box will bring you to a window with the two offset values for your axes. Adjusting these values will determine where the tool sets its zero point after hitting the limit switch. Each axis is capable of slightly more travel than advertised so this will not eat into your 6" of x travel.
|
Re: Plate and cut location dimensions April 07, 2015 01:02PM | Posts: 453 |
Everything Brian said plus:
If you want to do a lot of set and cut work, I strongly recommend laser crosshairs, either DIY or from the Handibot store.
I often set Zero to the center of the machine and do my Vcarve file the same way, working with positive and negative X&Y values for the little set on sheet/board cuts.
If you want to do a lot of set and cut work, I strongly recommend laser crosshairs, either DIY or from the Handibot store.
I often set Zero to the center of the machine and do my Vcarve file the same way, working with positive and negative X&Y values for the little set on sheet/board cuts.
|
Re: Plate and cut location dimensions April 07, 2015 01:23PM | Admin Posts: 622 |
Mark makes a good point about moving the tool zero to the center of both axes. Because you're usually moving the handibot to the part of your material that you want to cut, it makes a lot of sense to have 3-4" on either side of your mark to complete the cut rather that trying to find the lower left hand corner of each feature.
|
Re: Plate and cut location dimensions April 07, 2015 08:53PM | Posts: 9 |
Thanks! Those are great tips.
I'm fascinated trying to do reverse engineering thought experiments to try and figure out what led to the sizing if the components. They don't seem to be natively metric or imperial.
But I'm confident that I'm ignorant of a long string of design decisions that addressed various constraints to end up with this layout. It's been interesting already trying to break some of my fixed table thinking.
Cheers,
--tim
|
Re: Plate and cut location dimensions April 22, 2015 09:22PM | Admin Posts: 71 |
Well ... not to spoil the fun, Tim ...
But, an awful lot of the locations and dimensions of things just came from the process of visual fussing to get it all to fit and look right.
And, at one point we thought we had a way to get the prox switches to exactly trigger on those points at .05" ... well, the best laid plans.
But in terms of such mysteries, here's one to ponder. The only people we have found that make those beautiful big bolts we use, make them for a metric hex key (Allen wrench) but only with 1/4"-20 threads?
Ted Hall, ShopBot
|
Re: Plate and cut location dimensions May 03, 2015 11:37AM | Posts: 15 |
|
Re: Plate and cut location dimensions May 04, 2015 02:09PM | Admin Posts: 71 |
Oh, and just a side note: You can alter the software settings for the offsets from the Prox Switches to put the tool exactly where you want it. Use the TOOLS > SHOPBOT SETUP system in the ShopBot software ... or, you can just open up the "my_variable.sbc" file in the "C:\SbParts\Custom" folder and manually enter new offsets ... it is "relatively" straightforward.
Of course, there is not a lot of wiggle room to move these settings around and still get a full work area.
Ted Hall, ShopBot Tools
Of course, there is not a lot of wiggle room to move these settings around and still get a full work area.
Ted Hall, ShopBot Tools
Sorry, only registered users may post in this forum.