Home
>
Handibot Forum
>
Topic
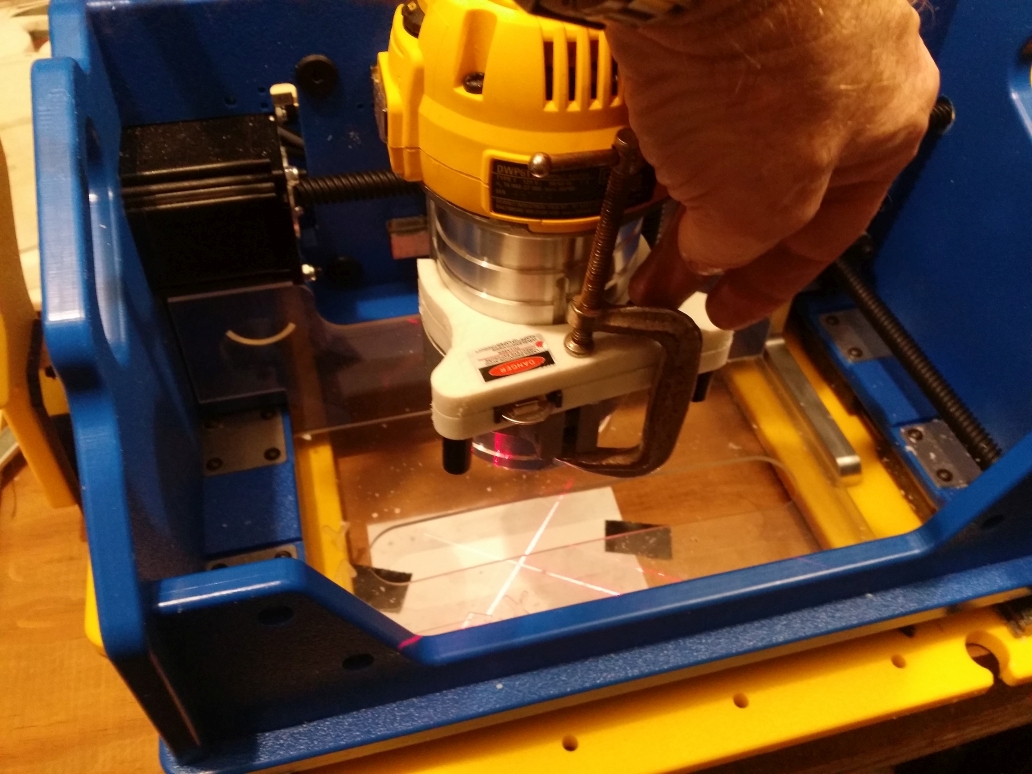
Finally built the laser jig
Posted by deagan492
|
Finally built the laser jig June 03, 2015 04:47PM | Posts: 9 |
I'd meant for some time to take advantage of the wonderful instructions provided by Brian Owen for building the Laser Alignment Jig.
I'd hesitated for some time since the only plastic I have is the pile of cutting boards I've scored at Goodwills and Savers. Oddly enough, these are almost universally .4" thick. The plans call for using .5" stock and I was worried. I decided to give it a try and modified the CRV file so that it would work with .4" stock and went ahead and made the cuts (something screwed up in the first run which trashed the top half, so I cut that part again independently. The krufty plastic chips cleaned off with a wire brush and utility blade.

I ended up with a working device! It wobbled a bit and was prone to movement (which doesn't help serve the purpose of consistent registration.) This may be related to the overall size being .2" smaller than designed. I overcame this with a small C clamp that locks it in place and still works with the cover on.
I'm super excited! It was a great experience to have the plans and parts detailed for this wonderful enhancement.
I'd hesitated for some time since the only plastic I have is the pile of cutting boards I've scored at Goodwills and Savers. Oddly enough, these are almost universally .4" thick. The plans call for using .5" stock and I was worried. I decided to give it a try and modified the CRV file so that it would work with .4" stock and went ahead and made the cuts (something screwed up in the first run which trashed the top half, so I cut that part again independently. The krufty plastic chips cleaned off with a wire brush and utility blade.
I ended up with a working device! It wobbled a bit and was prone to movement (which doesn't help serve the purpose of consistent registration.) This may be related to the overall size being .2" smaller than designed. I overcame this with a small C clamp that locks it in place and still works with the cover on.
I'm super excited! It was a great experience to have the plans and parts detailed for this wonderful enhancement.
|
Re: Finally built the laser jig June 03, 2015 05:31PM | Admin Posts: 622 |
Very cool! How is the battery holder working out? I eventually added a tab on the bottom half of the shell that engages the bottom of the battery clip--this eliminated the need for super glue to hold the clip in place. Perhaps the slimmer 0.8" thick design is something we should try here in the shop!
|
Re: Finally built the laser jig June 04, 2015 11:48AM | Posts: 9 |
The battery holder worked great. I was glad that I ordered the exact parts defined in the instructions. The battery holder snapped into the frame (horizontally) which was nice. The vertical motion was suppressed with the recommended super glue and seems to be working great. I can imagine it being difficult to have it held strictly by the frame since all but the thin rim varies in height to accommodate the insertion of a battery and the spring to tension it.
It might be feasible to only lock it in place around the back rim, but that's a tight fit. However, having said that, it's not significantly different than the size of the frame's rim/ledge that snaps together nicely.
I do wish I'd used a thicker plastic so that I could have used countersunk holes for the three screws. The unit now stands on the three screw heads against the router bracket. That's actually not bad, but I'd love to have a flush surface.
Once again, I want to complement the models, design and blog post that made this a super easy project!
|
Re: Finally built the laser jig June 04, 2015 12:13PM | Posts: 453 |
This looks awesome, you should add a few details, make it an instructable, and enter it into my handibot contest over on G+
Even though I have one that came off the shopbot floor I'd love to see what you learned, what went wrong, etc.
And to everyone, whether you make it or buy it, everyone can use one of these. It is a huge help when dropping a pocket or cut out into a large piece of stock.
M
Even though I have one that came off the shopbot floor I'd love to see what you learned, what went wrong, etc.
And to everyone, whether you make it or buy it, everyone can use one of these. It is a huge help when dropping a pocket or cut out into a large piece of stock.
M
|
Re: Finally built the laser jig August 23, 2015 04:30PM | Posts: 1 |
Sorry, only registered users may post in this forum.