Home
>
Handibot Forum
>
Topic
Z-Leveling and limit switch adjustment
Posted by elalfy296
|
Z-Leveling and limit switch adjustment July 01, 2015 08:50AM | Posts: 8 |
Hello, I had a few questions that i was hoping someone could assist me with please:
Firstly:
Last night i was zero-ing the Handibot when the motors stalled at (Y,0). I quickly shut the unit off and discovered the carriage wasn't engaging the limit switch. There are 2 screws holding the limit switch in place and their heads are very easily stripped. Loosening these did not give much adjustment for the switch but enough to get it activated.
Question:
Is there a better way of adjusting the limit switch locations? Short of glueing something to the carriage, i'm not sure how to engage the switch better.
Secondly:
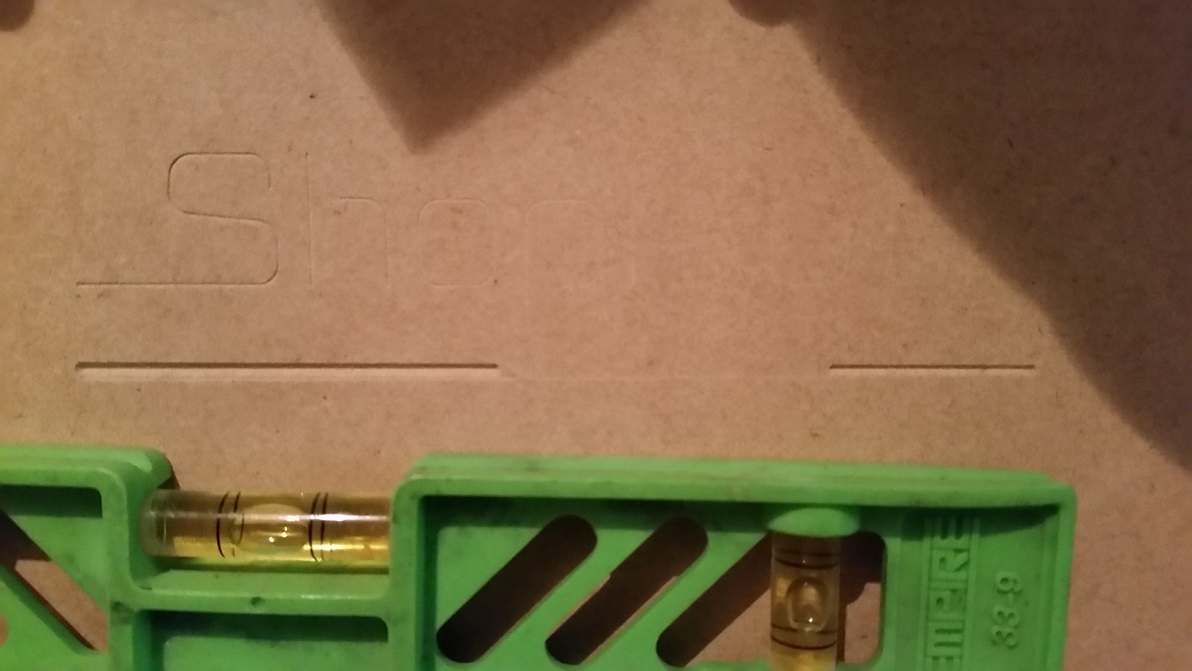
I tried to cut out the Shopbot logo and after changing the Z-proportion to 0.5 instead of 1.0 (to keep the dust down), i noticed the Z-axis is not level - see attached picture.
Question:
How do i get the Handibot squared in the Z-axis - is this the right procedure to follow? [shopbot.dozuki.com]
Thanks in advance!
Firstly:
Last night i was zero-ing the Handibot when the motors stalled at (Y,0). I quickly shut the unit off and discovered the carriage wasn't engaging the limit switch. There are 2 screws holding the limit switch in place and their heads are very easily stripped. Loosening these did not give much adjustment for the switch but enough to get it activated.
Question:
Is there a better way of adjusting the limit switch locations? Short of glueing something to the carriage, i'm not sure how to engage the switch better.
Secondly:
I tried to cut out the Shopbot logo and after changing the Z-proportion to 0.5 instead of 1.0 (to keep the dust down), i noticed the Z-axis is not level - see attached picture.
Question:
How do i get the Handibot squared in the Z-axis - is this the right procedure to follow? [shopbot.dozuki.com]
Thanks in advance!
|
Re: Z-Leveling and limit switch adjustment July 01, 2015 11:57AM | Admin Posts: 622 |
Has your Y limit switch worked in the past and just started having problems last night? We have shims in the shop that I could send out--you would place these under the limit switch to space it correctly to trigger on the metal bracket. Alternately it may just be easier to shim the switch with something like masking tape. The need for precision in the placement of these switches is one of the reasons that we switched over to the magnetically activated reed switches on handibot 1.1; I'm still working on upgrade instructions for handibot 1.0 users that want to make the change.
As for your Z-axis leveling--along which axis are you cutting that text? It looks like either your y or x axes are not parallel to your material. There's a number of things that could be causing this. Because the handibot sits directly on the material--flatness of the material (as well as any chips or dust under the tool) can have a big effect on depth consistency in shallow cuts like this. Before worrying about the rails, I would check that there aren't any chips stuck to the underside of the handibot that might be preventing it from sitting flat on your surface.
The rails themselves are attached to the tool on a jig in our shop to ensure squareness. To confirm that you rails are still aligned correctly, I would set the handibot on a surface that you know to be flat and clean (maybe a granite countertop?) and check that the bit height above the surface is consistent no matter where you move it in the x and y directions. Let me know what you find...
|
Re: Z-Leveling and limit switch adjustment July 01, 2015 02:45PM | Posts: 8 |
Thanks for the feedback. The unit was never operated before. I'm interested in the shims and more interested in a reliable solution. If there is any progress on the magnetic option, please let me know.
The text is running along the X-axis and though i thought i checked the levelness of the workpiece and how flush the base mates to the workpiece, i'll be sure to look at it again.
If not, do you think the machine needs to be adjusted? Is there code that can compensate for that? For example, can i somehow zero the Z at X,Y(0,0) and again at X,Y(6,0) so the handibot knows to compensate?
Thanks Brian.
Edited 1 time(s). Last edit at 07/01/2015 02:45PM by elalfy296.
|
Re: Z-Leveling and limit switch adjustment July 02, 2015 08:00AM | Posts: 8 |
Here's what i've done and found so far:
- Baseplate is square (image attached)
- Carriage was binding a little (difficult to move by hand from X (4) to end
- Adjusted the drive mechanism for X-only based on this: [shopbot.dozuki.com] and it no longer binds
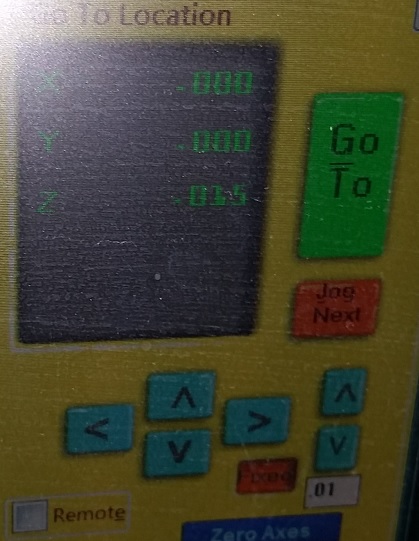
- Checked Z-zero at a few different points (image attached): carriage does not move coplaner to the X-Y plane and is about 0.035" off from X,Y(0,0) to (5,7) - checked Z-zero at 4 different points [(0,0), (1,1), (3,4), (5,7)] and got [(0.015), (0.01), (0.00), (-0.02)] respectively
- How can i adjust the X-axis such that Z is aligned at all points in the X,Y plane? If there is no adjustment, can i stack Aluminum foil between the baseplate and side wall to 'shim' it or is there a better way?
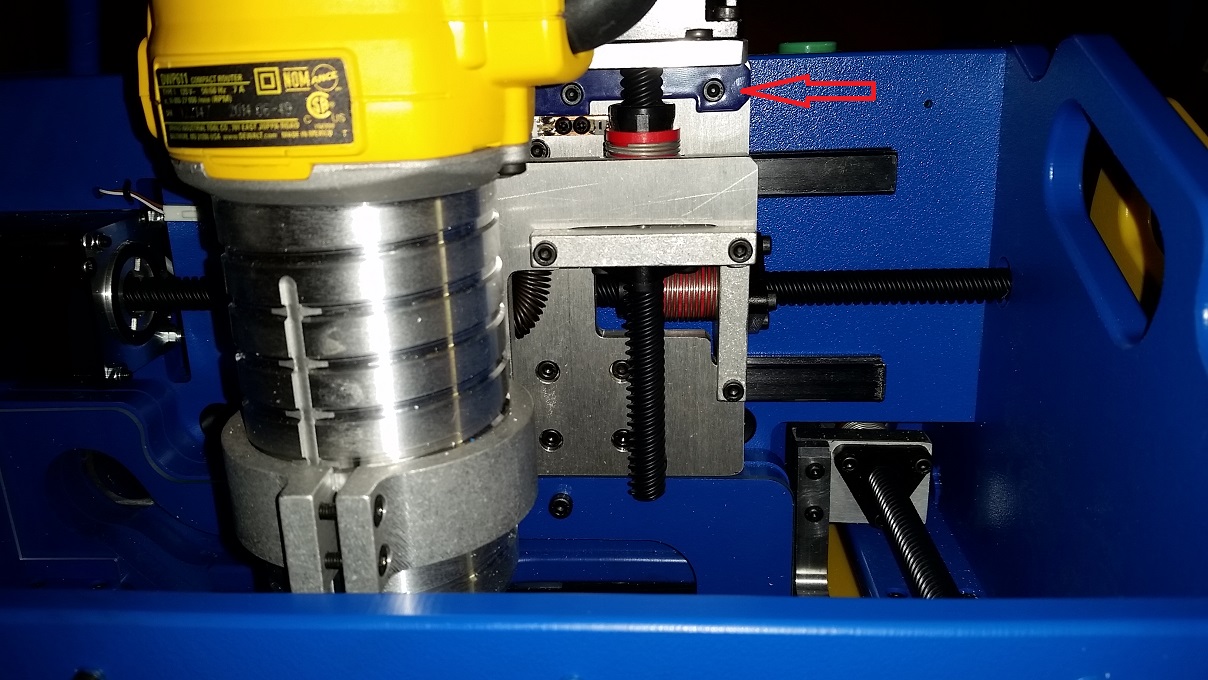
- What is the blue part hooked up to a spring shown with the red arrow in the picture attached?
Thank you all in advance!
Edited 1 time(s). Last edit at 07/02/2015 08:02AM by elalfy296.
- Baseplate is square (image attached)
- Carriage was binding a little (difficult to move by hand from X (4) to end
- Adjusted the drive mechanism for X-only based on this: [shopbot.dozuki.com] and it no longer binds
- Checked Z-zero at a few different points (image attached): carriage does not move coplaner to the X-Y plane and is about 0.035" off from X,Y(0,0) to (5,7) - checked Z-zero at 4 different points [(0,0), (1,1), (3,4), (5,7)] and got [(0.015), (0.01), (0.00), (-0.02)] respectively
- How can i adjust the X-axis such that Z is aligned at all points in the X,Y plane? If there is no adjustment, can i stack Aluminum foil between the baseplate and side wall to 'shim' it or is there a better way?
- What is the blue part hooked up to a spring shown with the red arrow in the picture attached?
Thank you all in advance!
Edited 1 time(s). Last edit at 07/02/2015 08:02AM by elalfy296.
|
Re: Z-Leveling and limit switch adjustment July 02, 2015 08:31AM | Admin Posts: 622 |
Adjusting the x axis would mean taking the two x rails loose--which is difficult because the mounting screws are hidden inside the electronics enclosure. I think that shimming would be a much easier option. However, I'd put the shims between the bottom of the blue exoframe base and the bearing cars on the right side of the tool. You can remove the 8 screws holding those bearing cars against the base to slip in your shims. Of course, when you re-tighten the bolts for the bearing cars, be sure to use a fence against the front of the tool (as in the alignment procedure).
That blue hanger and spring in your picture are used to counterbalance the weight of the z-axis and router. Without those in place there would be the risk of the router dropping and gouging your work when the power to the handibot was switched off.
That blue hanger and spring in your picture are used to counterbalance the weight of the z-axis and router. Without those in place there would be the risk of the router dropping and gouging your work when the power to the handibot was switched off.
|
Re: Z-Leveling and limit switch adjustment July 02, 2015 08:54AM | Posts: 8 |
Thanks for the quick and thorough response Brian, i appreciate it. Will future version of the bot have either adjustable axes or auto leveling like for the repraps [forums.reprap.org] ?
|
Re: Z-Leveling and limit switch adjustment July 02, 2015 09:29AM | Admin Posts: 622 |
Both actually! In redesigning for handibot 2.0 I've made the x and z axes part of a subassembly that is built onto an aluminum plate. This plate can be adjusted in the tool to align it with the base. I also spoke with the guys developing our new control software (FabMo) yesterday and they are building in a feature that will allow users to touch off on multiple points in the x-y plane and correct in software for any skew that may become apparent.
|
Re: Z-Leveling and limit switch adjustment July 02, 2015 09:40AM | Posts: 8 |
|
Re: Z-Leveling and limit switch adjustment July 02, 2015 10:21AM | Posts: 8 |
I plan on using this: [www.homedepot.com] if anyone sees a red flag, please waive it at me before i begin this endeavour.
Edited 1 time(s). Last edit at 07/02/2015 10:22AM by elalfy296.
Edited 1 time(s). Last edit at 07/02/2015 10:22AM by elalfy296.
|
Re: Z-Leveling and limit switch adjustment July 02, 2015 10:33AM | Posts: 453 |
I find this exciting (like most 2.0 revelations), I've never had huge problems with offsets in z over the x and y but as we get more complex on designs this may well be a life safer.
Does this mean that the Z zero will come pre-installed on 2.0?
Brian Owen, ShopBot Wrote:
-------------------------------------------------------
> [url=https://handibot.com/blog/2015/05/development
> -team-report-may-2015/]Both[/url] actually! In
> redesigning for handibot 2.0 I've made the x and z
> axes part of a subassembly that is built onto an
> aluminum plate. This plate can be adjusted in the
> tool to align it with the base. I also spoke with
> the guys developing our new control software
> (FabMo) yesterday and they are building in a
> feature that will allow users to touch off on
> multiple points in the x-y plane and correct in
> software for any skew that may become apparent.
|
Re: Z-Leveling and limit switch adjustment July 02, 2015 12:27PM | Admin Posts: 622 |
Mark, my current HB2 prototype has a built in z-zero plate (you can see it on the rear view of the handibot in the blog post). It is grounded through the metal baseplate all the way to the control card--so no wires required. The idea is that the user will do a one time setup to determine the offset between that plate and the material under the handibot. They could then just flip this plate out whenever they have a bit change and get a consistent zero without worrying about finding the same spot on their material. It also accomplishes one of my goals of having less detachable parts for the handibot (less detachable parts means less pieces that could get accidentally left behind on the job when you take the tool home). However, based on the feedback from this thread I'm thinking that if may still be useful to have the ability to zero off of multiple points on the material quickly. I'll try to think of a way to accomplish both goals.
Also for shims--I've always liked foil tape like this: [www.homedepot.com] because it is less likely to shift as you put your tool back together.
Also for shims--I've always liked foil tape like this: [www.homedepot.com] because it is less likely to shift as you put your tool back together.
Sorry, only registered users may post in this forum.