Home
>
Handibot Forum
>
Topic
how big is the cutting area, where should it start?
Posted by cuervo
|
how big is the cutting area, where should it start? January 09, 2019 03:10AM | Posts: 101 |
|
Re: how big is the cutting area, where should it start? January 10, 2019 10:19AM | Posts: 101 |
after grabbing a ruler its actually closer to 2.5 inches from the rail but it still leaves room to move over. Last night I tried my first project that involved tiling and I was surprised to see that the 2nd tile started over about an inch further then the first. Is there a way to move the first one over that extra inch as well?

My latest project is to make a case for a first day cover that is signed by 11, 500 home run hitting hall of famers. Like on the switch plate I first painted the plexi and then with the diamond tip engraver went over the letters. I set it up for 6 x 8 tiles with a 1/4" overlap. For some reason it moved the larger letters up what looks to be about a 1/4", is that because of the overlap? I assume it would be better to try and split up the engraving so the tiling does not go through it somehow or is there a better way to clamp it down to ensure its in the perfect location? Like I said this was the first time I have dug out the tiling jig so its all new learning for me, thanks for taking the time and sharing.
My latest project is to make a case for a first day cover that is signed by 11, 500 home run hitting hall of famers. Like on the switch plate I first painted the plexi and then with the diamond tip engraver went over the letters. I set it up for 6 x 8 tiles with a 1/4" overlap. For some reason it moved the larger letters up what looks to be about a 1/4", is that because of the overlap? I assume it would be better to try and split up the engraving so the tiling does not go through it somehow or is there a better way to clamp it down to ensure its in the perfect location? Like I said this was the first time I have dug out the tiling jig so its all new learning for me, thanks for taking the time and sharing.
|
Re: how big is the cutting area, where should it start? January 10, 2019 05:06PM | Posts: 101 |
not sure if I am talking to myself but I had one thought about how to do this. With a little bit of work I was able to arrange the tile sizes so that the lines go through where there is no engraving being done. Only problem then is that my tile sizes are 5.75" x 6.43" and lining those up by eye will be hard to do accurately enough. I don't think there is a way to use the standard tile set up with out going 6 x 8" correct? Does this mean I need to cut a new jig that would allow me to move the bot to these measurements
|
Re: how big is the cutting area, where should it start? January 10, 2019 05:11PM | Admin Posts: 622 |
So--I would recommend not using any overlap for your tiling. In my experience it tends to just lead to more obvious defects than no overlap at all. Also--overlap would require a non-standard jig. There isn't really any easy way to do tiles that aren't 6" wide with the basic handibot jig. Here in the shop--one of the guys has a setup where he just bolts down a straight edge with an inch scale on it, there's a tick mark on the front of his handibot and he just slides it up and down the scale when tiling. This would let you get unusual size tiles--and the weight of the handibot should be sufficient for holding it in place while you cut.
|
Re: how big is the cutting area, where should it start? January 10, 2019 05:31PM | Posts: 101 |
|
Re: how big is the cutting area, where should it start? January 10, 2019 05:42PM | Admin Posts: 622 |
|
Re: how big is the cutting area, where should it start? January 10, 2019 06:43PM | Posts: 101 |
|
Re: how big is the cutting area, where should it start? January 10, 2019 06:50PM | Posts: 101 |
|
Re: how big is the cutting area, where should it start? January 11, 2019 11:02AM | Admin Posts: 622 |
|
Re: how big is the cutting area, where should it start? January 11, 2019 10:32PM | Posts: 101 |
|
Re: how big is the cutting area, where should it start? January 13, 2019 01:58AM | Posts: 101 |
does that look ok? At one point I was having issues where when I did the 3d rendering it was showing things were off a little so I saved all the programs again and made sure it was marking the correct areas and it seemed to correct it.
The more I think about it there should be some way to cut the shape out and then either by using the mounting holes to move/hold it where I need it, or again by cutting out the outline in another board to then mount it down at the specific places I need it held down at to do the correct engraving. I just am not sure how to do it exactly, probably need to test it out a few times I guess. Maybe I will use some cardboard at first to see if it will engrave it correctly rather then spoiling acrylic.
The more I think about it there should be some way to cut the shape out and then either by using the mounting holes to move/hold it where I need it, or again by cutting out the outline in another board to then mount it down at the specific places I need it held down at to do the correct engraving. I just am not sure how to do it exactly, probably need to test it out a few times I guess. Maybe I will use some cardboard at first to see if it will engrave it correctly rather then spoiling acrylic.
|
Re: how big is the cutting area, where should it start? January 13, 2019 10:48AM | Admin Posts: 622 |
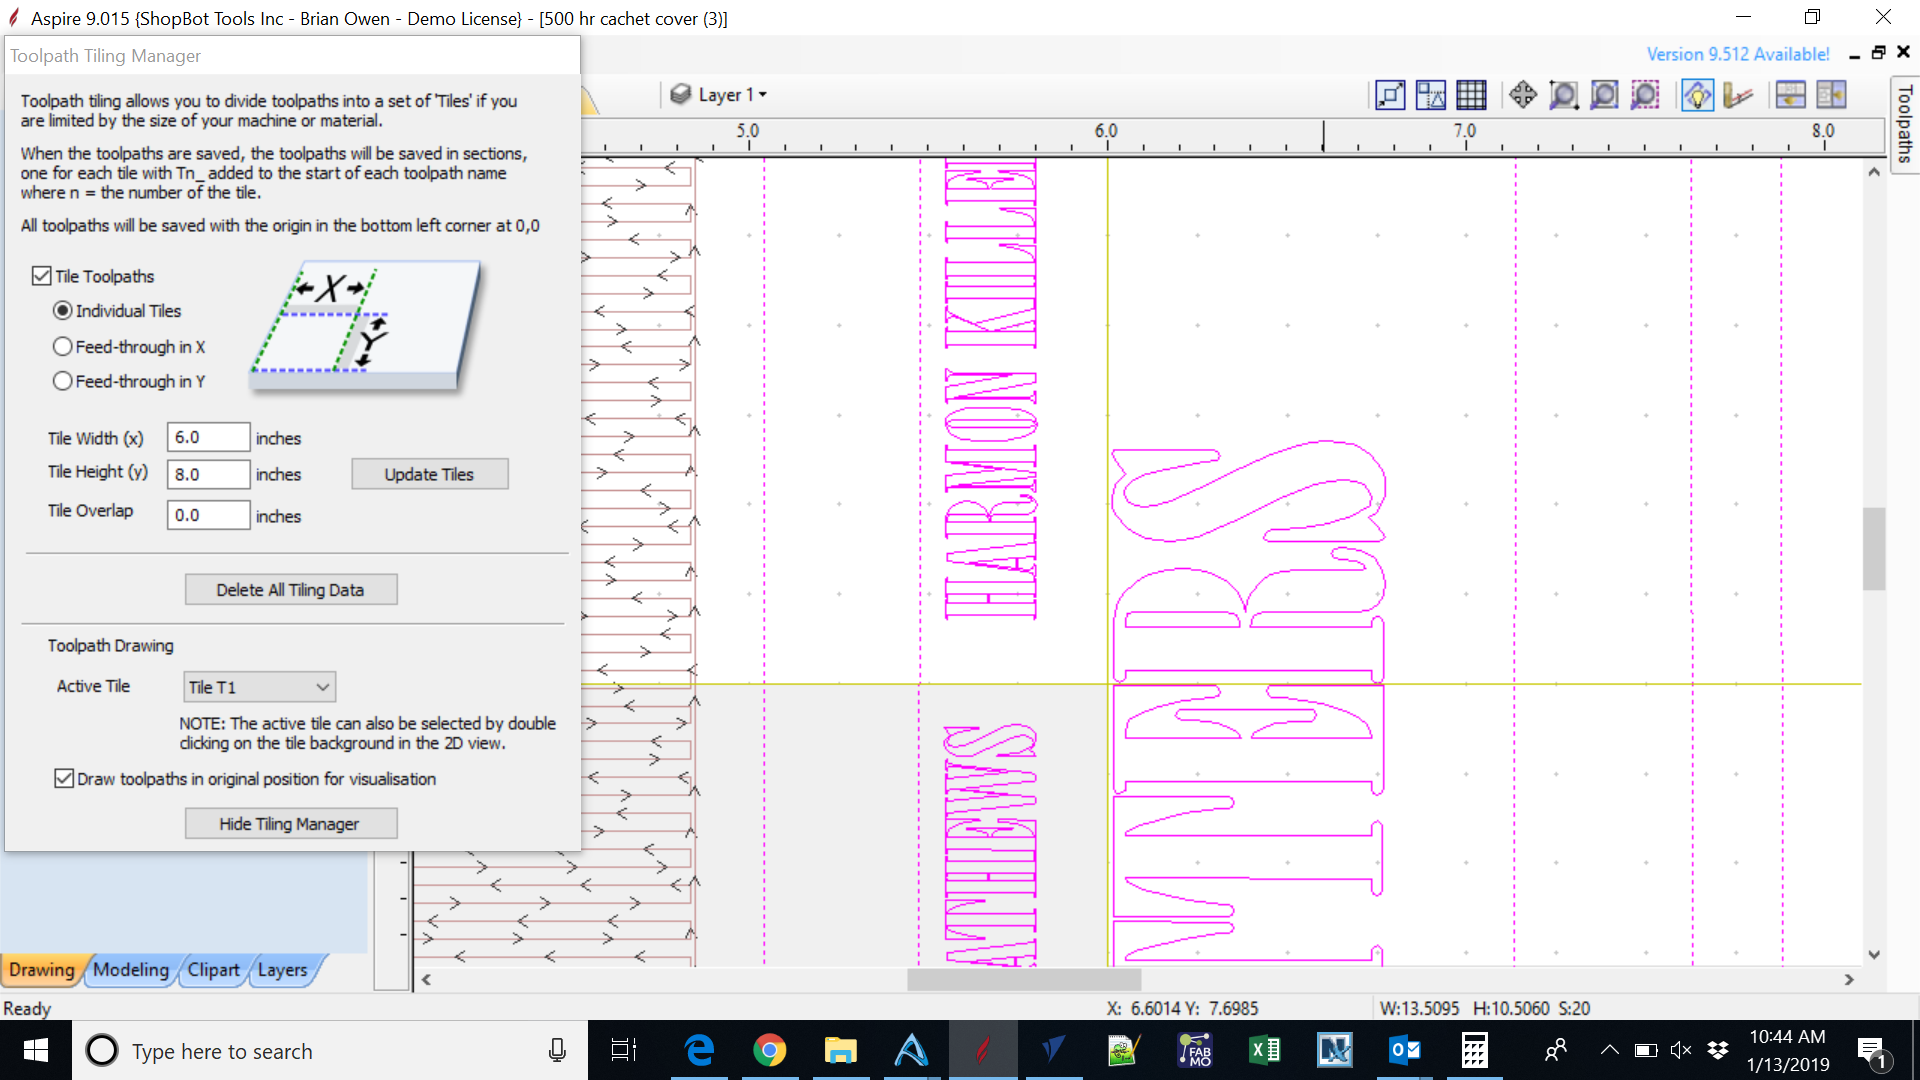
Take a look at the attached photo--this is what I'd recommend...switching back to 6x8 sized tiles--and shifting the parts a little bit in your layout so that none of the big letters are split across tile divisions. Carving letters in two tiles is always going to be tricky because any little misalignment is going to be visible and there isn't any way to fix it with a little bit of sanding. Profiles, on the other hand, are pretty easy and if there's a little mark where the tile break was made--you can sand it away easily.
|
Re: how big is the cutting area, where should it start? January 13, 2019 05:23PM | Posts: 101 |
Sorry, only registered users may post in this forum.