Home
>
Handibot Forum
>
Topic
workbenches and hold-down fixtures, suggestions, successes
Posted by romeug
|
workbenches and hold-down fixtures, suggestions, successes August 11, 2014 05:27PM | Posts: 11 |
I have been operating a Bridgeport Boss 1 conversion for years, past 4 a 3d printer with a vast array of metal working and wood tools both hand and tied into the grid...the handibot seems like an excellent take off point for less restriction in scaling, and on site work. One of the things that always fascinated me with the Bridgeport CNC (4 axis, rotary table) is designing hold down fixtures to complement a wide variety of materials including irregular shapes and items like vertical cylindars. the T slot table was really excellent for this with all the possible fixtures. I milled a variety of vacuum holds as well. This machine is a whole other species, and requires very different approaches to what i have done in the past.
I would be very interested on how others have clamped material, designed or utilized workbenches, fences, clamps, etc. I believe that the expansive possibilities of this machine can be exploited as much as app development through a dictionary of different ways of holding material and maintaining relative positioning when changing out bits and moving stock (as in the fence accessory, but moving/revolving the piece rather then the machine).
As an example, i am trying to figure out a way to do a 'fancy' tenon to fit a mortise on a leg to get an idea of what i am talking about.
But i am interested in anything anyone has done.
|
Re: workbenches and hold-down fixtures, suggestions, successes August 12, 2014 12:54PM | Posts: 453 |
I do hope others will chime in but let me get it started.
On large sheets of sheet goods the large area jig. The sheet and the handibot will stay in place with just friction.
Smaller sheet goods, screws though the sheet into the wast board. Wooden cams and hold downs similar to what you'd use on a mill.
Other smaller shapes, carpet tape, hot glue, custom spoil board with cutout for shape, Screws through sacrificial material is the bomb if it can be done.
|
Re: workbenches and hold-down fixtures, suggestions, successes August 13, 2014 09:56AM | Posts: 11 |
nice Mark,
one thing i would like to add concerning small pieces...I was commissioned to make rather small Hebrew letters out of mahogany on my Bridgeport a few years back that would be cut free from the half inch mahogany board through the milling process. I used watered down yellow glue on both sides of a sheet of Kraft paper in between my sacrificial underlayment ply with and the mahogany (clamped for a half hour). It held very securely through the milling process, and easily popped off with a sharp chisel/razor blade retaining all the fine points of the lettering. any residue of paper on the letters came off with either scraping or damp sponge and scraping. It laid flatter then the foam double stick (tended to wobble), and did not compromise the finer bits or split the letters upon removal as the double backed carpet tape .
I was cutting out 10 or 12 letters per sheet (about 1.5" each), so spotting hot glue would have been a bit too much of a hassle, though i did not try it. I felt that I needed support over the entire area of the letters as they were done 3 axis and filleted to sharp points at the ends.
|
Re: workbenches and hold-down fixtures, suggestions, successes August 13, 2014 04:34PM | Posts: 453 |
|
Re: workbenches and hold-down fixtures, suggestions, successes August 13, 2014 08:03PM | Posts: 11 |
and I will be looking forward to your results Mark, with pictures of course...
I have been thinking (though have not tried it) of a derivation substituting shellac and kraft paper for porous woods (like white oak) where there may be finish issues with any glue residue. Alchohol would be the solvent, though i have never objected to base coat of a good shellac...gabriel
I have been thinking (though have not tried it) of a derivation substituting shellac and kraft paper for porous woods (like white oak) where there may be finish issues with any glue residue. Alchohol would be the solvent, though i have never objected to base coat of a good shellac...gabriel
|
Re: workbenches and hold-down fixtures, suggestions, successes August 14, 2014 08:33PM | Posts: 5 |
Ok this is a left of field suggestion, but if glue residue is a concern you might try milk and paper. I've found milk suprisingly useful for sticking paper labels to beer bottles in the home brew world. Holds fast until you wash them; then they come off without a trace.
I've no idea how it would hold up with wood in a milling situation (milling with tabs that are removed in a final pass may help). If you need more stick then according to the internet you can also add a couple of simple ingredients to milk to increase the gluiness (http://www.instructables.com/id/Make-your-own-glue/?ALLSTEPS) I'd expect the resulting glue to also wash off fairly easily.
Mitch
|
Re: workbenches and hold-down fixtures, suggestions, successes August 14, 2014 09:00PM | Posts: 11 |
|
Re: workbenches and hold-down fixtures, suggestions, successes September 30, 2014 11:09PM | Posts: 11 |
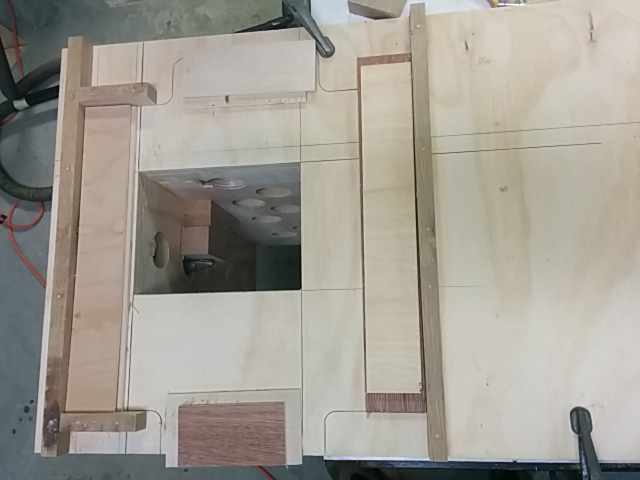
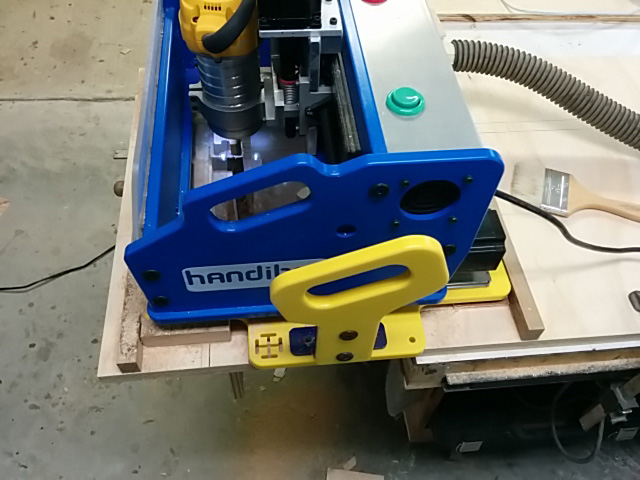
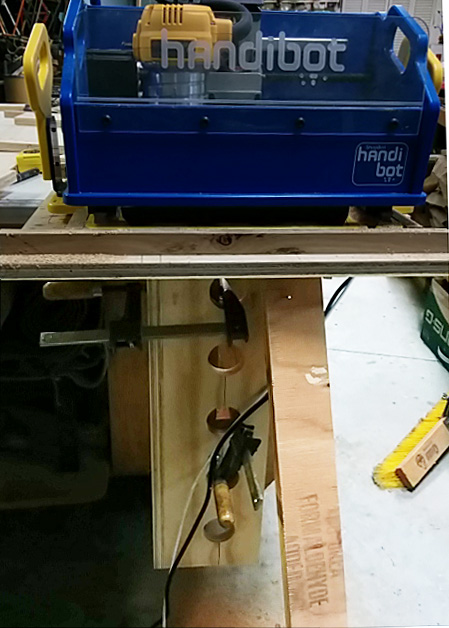
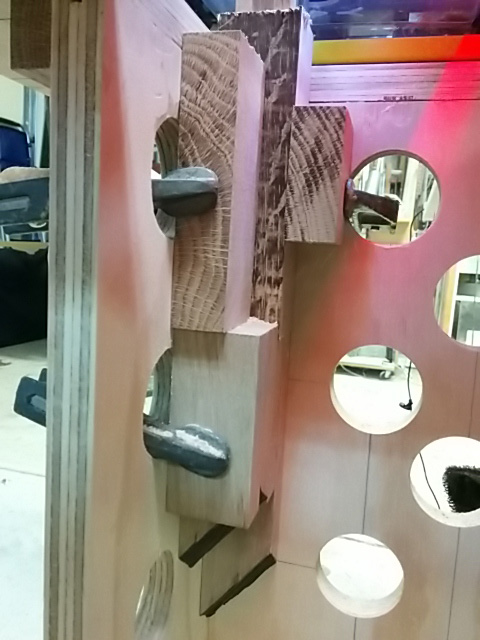
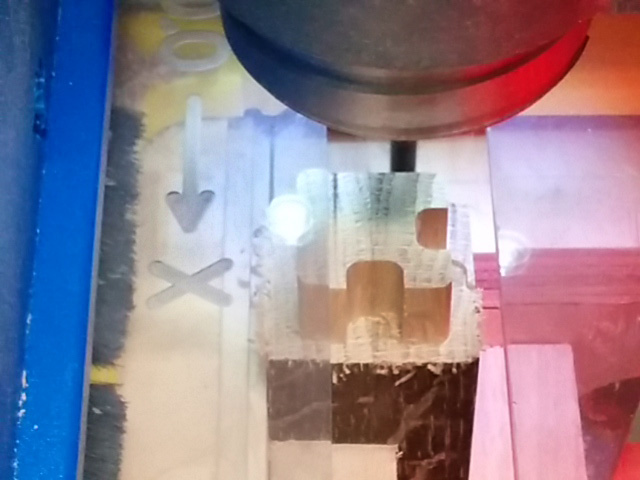
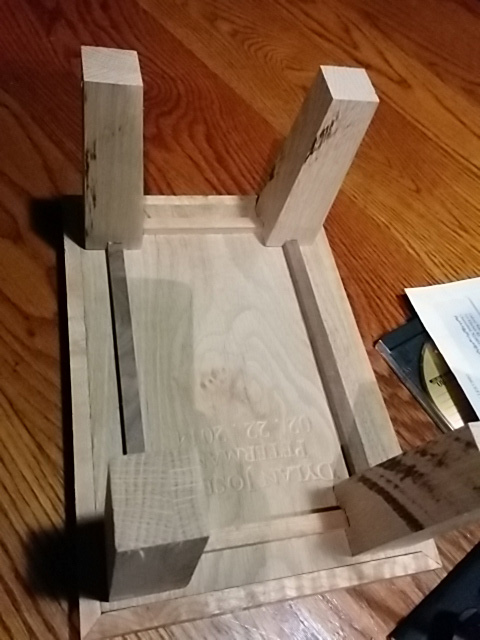
here are some photographs of a tenoning jig that has been successful.
Attachments:
open | download - top of jig no machine.jpg (84.6 KB)
open | download - machine in place.jpg (122.1 KB)
open | download - lateral.jpg (118.4 KB)
open | download - clamping from two sides.jpg (111.3 KB)
open | download - cutting tenon.jpg (93.4 KB)
open | download - final.jpg (114.9 KB)
open | download - together stretchers.jpg (107.4 KB)
|
Re: workbenches and hold-down fixtures, suggestions, successes October 02, 2014 02:18AM | Posts: 453 |
|
Re: workbenches and hold-down fixtures, suggestions, successes October 02, 2014 10:12AM | Posts: 11 |
That is so kind Mark.
YOur thinking is the logical direction, and I am looking forward to where it leads. If they are short pieces, either > then 6 or 8 inches, this jig should be fine as i used the limits of the machine for the cutout. If they were symmetrical in all axis, perhaps double the size by flipping.
the more interesting problem is having it register over an expanse. I could see one of those verticals removed (probably the y axis in the case of this jig), the remaining X supported from the back, and clamping a slide for the stock (and marking it every 6 inches), slide it and clamp. each interval.
I would have rethought my design by positioning the machine at 90 degrees (to have the additional 2 inches of Y axis), used a stop for mortises.
does this make sense?
What have you been thinking?
best, gabriel
|
Re: workbenches and hold-down fixtures, suggestions, successes October 03, 2014 03:09AM | Posts: 453 |
Gabriel:
My take on this is to take the rotery axis jig (can be seen on the blog) and simply extend it with some swapable parts.
For the vertical you'd remove the aluminum extrusion and install stablizing ends to the bottom add clamps and work holding parts.
For the on edge the extrusion could stay in, just add some spacers and clamping.
The overall concept is much the same as yours just reuseing one jig for two or more uses with some additional parts.
Also you will find doing stuff like you illustrated so much easier if you will mount alinment lasers and make 0,0 the center of your work. This is a wonderful thing in VCarve, you can move things around like that.
[handibot.com]
Edited 1 time(s). Last edit at 10/03/2014 03:19AM by Mark Evans.
|
Re: workbenches and hold-down fixtures, suggestions, successes October 03, 2014 09:44PM | Posts: 11 |
>Also you will find doing stuff like you illustrated so much easier if you will mount alinment lasers and make 0,0 the center of your work.
I used that strategy extensively on the Bridgeport CNC as i milled a lot of cylinders on the vertical. In this case, as much of the work is on the tenons of legs that start square or rectangular (the taper (or turning) comes after, as in the case of the pictured stools) and the registration of the corner of the clamping box is 0,0 (note the rather hacked chiseling on the inside of the box to insure this with a slightly couple of thou. offset biscuit joint
HOwever, your idea of a modification of the indexing jig (had not seen it before, did not even know of the blog) is an excellent solution for doing a variety of possible approaches including your edge work, and of course with a rotary indexer, my jig would be rendered obsolete.
Sorry, only registered users may post in this forum.