Home
>
Handibot Forum
>
Topic
Cut doesn't match preview - What am i doing wrong??
Posted by Lussier517
|
Cut doesn't match preview - What am i doing wrong?? September 03, 2014 07:47AM | Posts: 7 |
graphic designer and now CNC newbie here. 12 hours with the handibot.
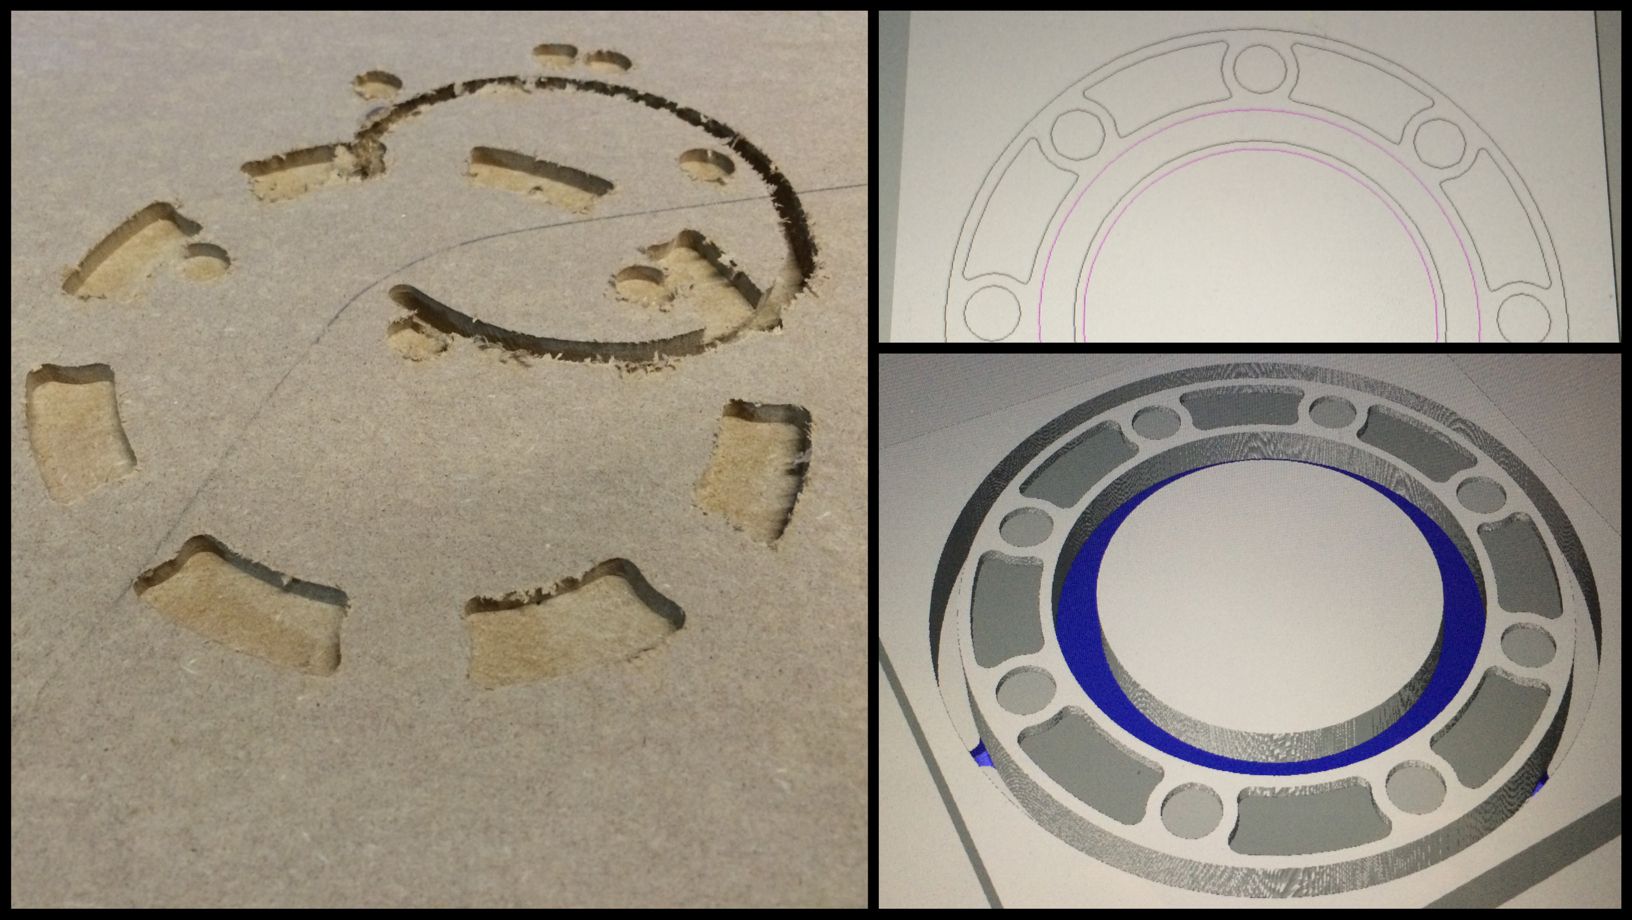
when i go to cut my file it shows up like the attached picture.
the first pocket pass is right, but after that the cuts derail all over the place.
is my error in the Vcarve setup or when i take it to the shopbot control software?
can anyone shed light on what i'm doing wrong?
i'm attaching the shopbot file.
|
Re: Cut doesn't match preview - What am i doing wrong?? September 03, 2014 05:52PM | Posts: 19 |
It appears that you are making a circle outside the 6" limit for x. I get similar results when the machine hits the limits of the device. It automatically rattles a bit and then resets (0,0,0) so the next set of cuts are off center from the original cuts. Your code has numbers greater than 6 in both the x and y. Just my thoughts.
Best wishes. Tim
Best wishes. Tim
|
Re: Cut doesn't match preview - What am i doing wrong?? September 03, 2014 06:49PM | Posts: 453 |
|
Re: Cut doesn't match preview - What am i doing wrong?? September 03, 2014 07:56PM | Posts: 7 |
thanks for the help Mark & Tim.
in Vcarve, i made the "widget" 6" but placed it on on a 7" "Job Size".
(i was assuming that i would need a larger piece of material to cut the max 6" "widget") (like an bleed edge in printing)
i have two clarifying follow up questions:
1. the "Job Dimension"/ "Job Size" material in VCARVE should never exceed 6"x8" unless i plan on tiling?
2. can i actually cut to the 6X8 final size or should i always make my widget slightly smaller than the 6"x8" "Job Size"? (To avoid having to tile the widget)
|
Re: Cut doesn't match preview - What am i doing wrong?? September 03, 2014 09:38PM | Posts: 7 |
well...i started from scratch. (importing the vector PDF from corel draw into a brand new project file.)
i set the project size at 6"x6" per your advice.
photo attached to see what happen...
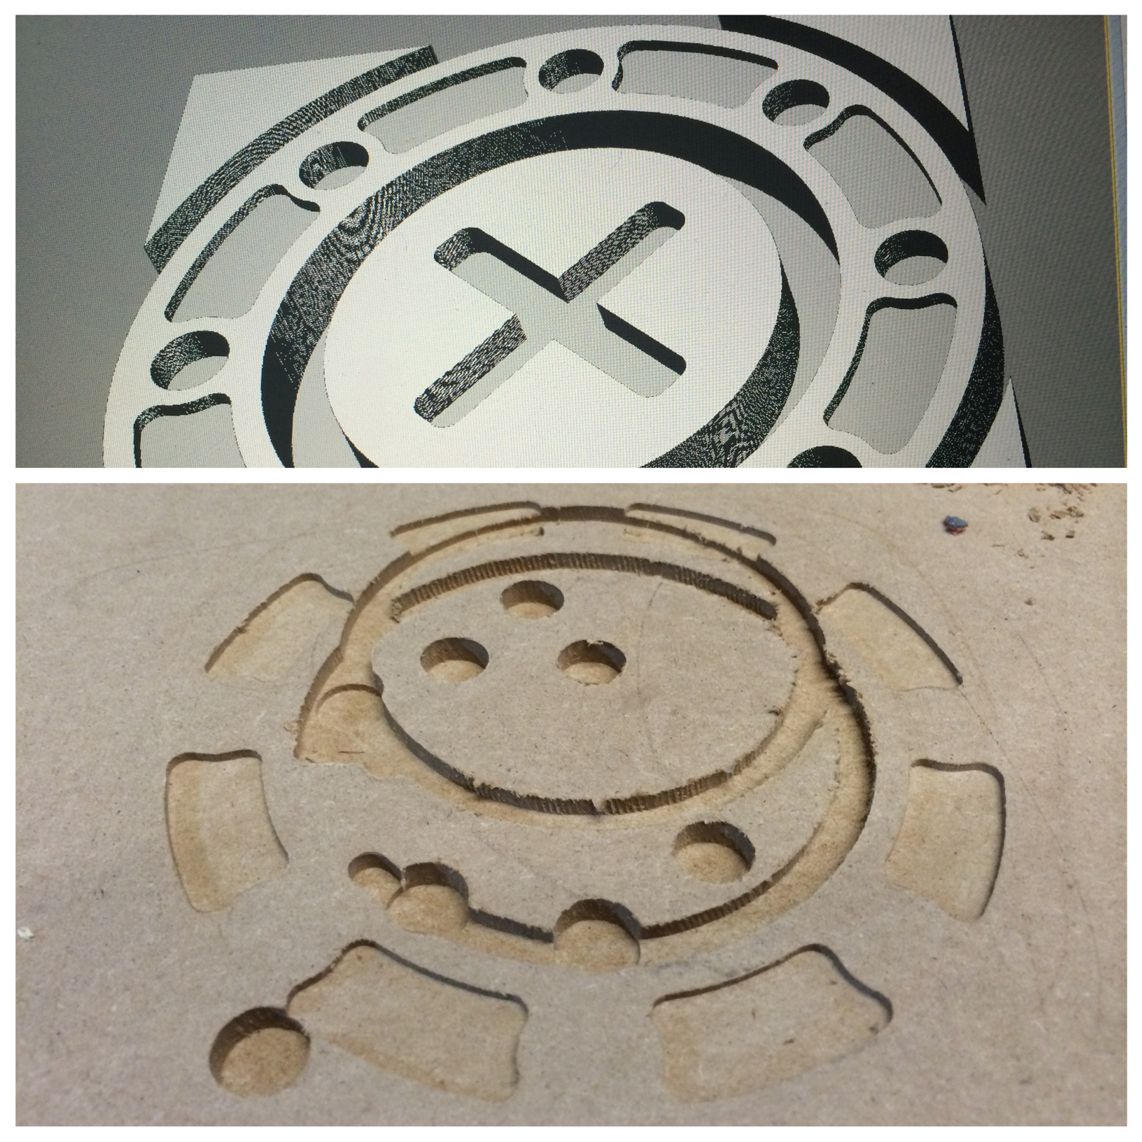
went to cut and the first pass was the small circles.
the second pass was the indented weird-shaped pockets.
this time from the beginning in started cutting the circles in a very random placement and then it when to the weird-shaped pockets and did those PERFECTLY.
next it went to cut the center pocket "groove" which it did for 1 pass but then "jumped" the next pass which through off the XY....
grrrr.... so much excitement and frustration.
any thoughts on what i did wrong this time?
attached is the project file
and a tiny b/w video of the cut. (to keep the file size under 614kb)
i set the project size at 6"x6" per your advice.
photo attached to see what happen...
went to cut and the first pass was the small circles.
the second pass was the indented weird-shaped pockets.
this time from the beginning in started cutting the circles in a very random placement and then it when to the weird-shaped pockets and did those PERFECTLY.
next it went to cut the center pocket "groove" which it did for 1 pass but then "jumped" the next pass which through off the XY....
grrrr.... so much excitement and frustration.
any thoughts on what i did wrong this time?
attached is the project file
and a tiny b/w video of the cut. (to keep the file size under 614kb)
|
Re: Cut doesn't match preview - What am i doing wrong?? September 04, 2014 03:20PM | Posts: 19 |
|
Re: Cut doesn't match preview - What am i doing wrong?? September 04, 2014 04:59PM | Posts: 453 |
|
Re: Cut doesn't match preview - What am i doing wrong?? September 08, 2014 10:09AM | Posts: 7 |
i'm fuzzy on a lot here...and i've read the Handibot User manual a couple times...
1. Does the handibot control the router speed or do i adjust that manually with the dial on the router?
2. When i am setting up my custom TOOL INFO in the TOOL DATABASE (in VCarvePro) do i have to set the spindle speed there, or adjust it manually on the router?
concerning RPM, when i read the owners manual of the dewalt router, it says:
SPEED SELECTION CHART
dial 1 - 16000 RPM
dial 2 - 18200 RPM
dial 3 - 20400 RPM
dial 4 - 22600 RPM
dial 5 - 24800 RPM
dial 6 - 27000 RPM
But when i use the chip load calculator with my bit: Onsrud 52-287 at a Cutting-Speed/Feed-Rate of 1inch/sec it tells me my Router needs to be 3000-6000 RPM.... which from the router manual seems to be an impossible speed to reach. ?!?
i'm so lost...
i very much appreciate your help... i am a RTFM kind of guy...I just can't seem to find the relevant info in the manuals.
Considering the Handibot is being marketed to the hobbyist with limited CNC experience, maybe there needs to be a better Handibot-specific manual/CNC-primer to walk a newbie through... i watched many Shopbot and Vcarve training videos and thought i was ready to dive in, but i keep having these cutting issues on what should be a routine and basic cutting project. So frustrating.
|
Re: Cut doesn't match preview - What am i doing wrong?? September 09, 2014 02:03AM | Posts: 453 |
comments in line:
MattLussier Wrote:
-------------------------------------------------------
> i'm fuzzy on a lot here...and i've read the
> Handibot User manual a couple times...
>
> 1. Does the handibot control the router speed or
> do i adjust that manually with the dial on the
> router?
NO, there is not speed controller, I had a heck of a time figuring that out. use the knob on the Dewalt.
That really needs to be spelled out in bold.
> 2. When i am setting up my custom TOOL INFO in the
> TOOL DATABASE (in VCarvePro) do i have to set the
> spindle speed there, or adjust it manually on the
> router?
You can type anything you want in there as I has no effect, see #1
> concerning RPM, when i read the owners manual of
> the dewalt router, it says:
> SPEED SELECTION CHART
> dial 1 - 16000 RPM
> dial 2 - 18200 RPM
> dial 3 - 20400 RPM
> dial 4 - 22600 RPM
> dial 5 - 24800 RPM
> dial 6 - 27000 RPM
>
> But when i use the chip load calculator with my
> bit: Onsrud 52-287 at a Cutting-Speed/Feed-Rate of
> 1inch/sec it tells me my Router needs to be
> 3000-6000 RPM.... which from the router manual
> seems to be an impossible speed to reach. ?!?
Yup, chip loading is a big fat compromise using a router, the good news is wood and wood like products are quite forgiving on chip load.
Two things you can do, run the router at 4-5 in softer woods (I find much lower than 4 and there is not much torque) and get some one flute bits, one flute over two in the calculations gets you much closer to what you want. I just got one in 1/4 and 1/8th and love them. Nice healthy chips and so quite.
> i'm so lost...
We'll get you found!
>
> i very much appreciate your help... i am a RTFM
> kind of guy...I just can't seem to find the
> relevant info in the manuals.
RTFM is good but we are so close to being on our own here that you need to do more. Vetric's site will give you tons of info on VCarve, the regular shopbot forum has lots of good info as well as 90% of Handibot issues can be extrapolated from shopbot stuff. Lots of good shopbot video on YouTube
.
>
> Considering the Handibot is being marketed to the
> hobbyist with limited CNC experience, maybe there
> needs to be a better Handibot-specific
> manual/CNC-primer to walk a newbie through... i
> watched many Shopbot and Vcarve training videos
> and thought i was ready to dive in, but i keep
> having these cutting issues on what should be a
> routine and basic cutting project. So frustrating.
I am with you, the learning curve is steep but it is far from impossible for a reasonably intelligent person. I hope that they do come up with some good primer stuff for the new guys but in the mean time we can get though as a community.
I am like the most active person here as I want a lot of folk to succeed so when I have a problem you will be here for me.
One last thing, learn to search the forum, already a years worth of stuff here, lots of things we have already worked though.
|
Re: Cut doesn't match preview - What am i doing wrong?? September 09, 2014 02:09AM | Posts: 453 |
MattLussier Wrote:
-------------------------------------------------------
> thanks for the help Mark & Tim.
>
> in Vcarve, i made the "widget" 6" but placed it
> on on a 7" "Job Size".
> (i was assuming that i would need a larger piece
> of material to cut the max 6" "widget") (like an
> bleed edge in printing)
>
> i have two clarifying follow up questions:
>
> 1. the "Job Dimension"/ "Job Size" material in
> VCARVE should never exceed 6"x8" unless i plan on
> tiling?
You can go right out to 6x8 but you may drop vectors if the machine thinks it is about to hit a stop. Work in by one bit Diameter and you will always be good.
>
> 2. can i actually cut to the 6X8 final size or
> should i always make my widget slightly smaller
> than the 6"x8" "Job Size"? (To avoid having to
> tile the widget)
|
Re: Cut doesn't match preview - What am i doing wrong?? September 10, 2014 08:31AM | Posts: 7 |
WOW! ok... i think i figured out how i was screwing it all up!
i've been setting the cut rate/speed in the tool edit ONLY.
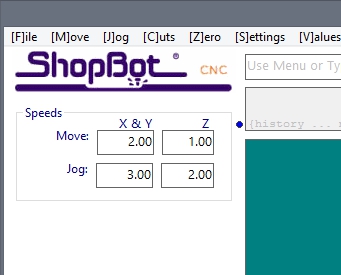
i've been ignoring the "SHOPBOT SPEED CONTROLS" area...they were set at the defaults.
I assumed those only applied to positioning the XYZ and not actually the cutting speed.
so each attempt to fix the problem was in vain. I thought the problem was in my vcarve project.
on a frustrated whim i popped all those settings down to .5 and tried it again.... SUCCESS... slow.... but SUCCESS!
So your input was right but i wasn't translating it right.
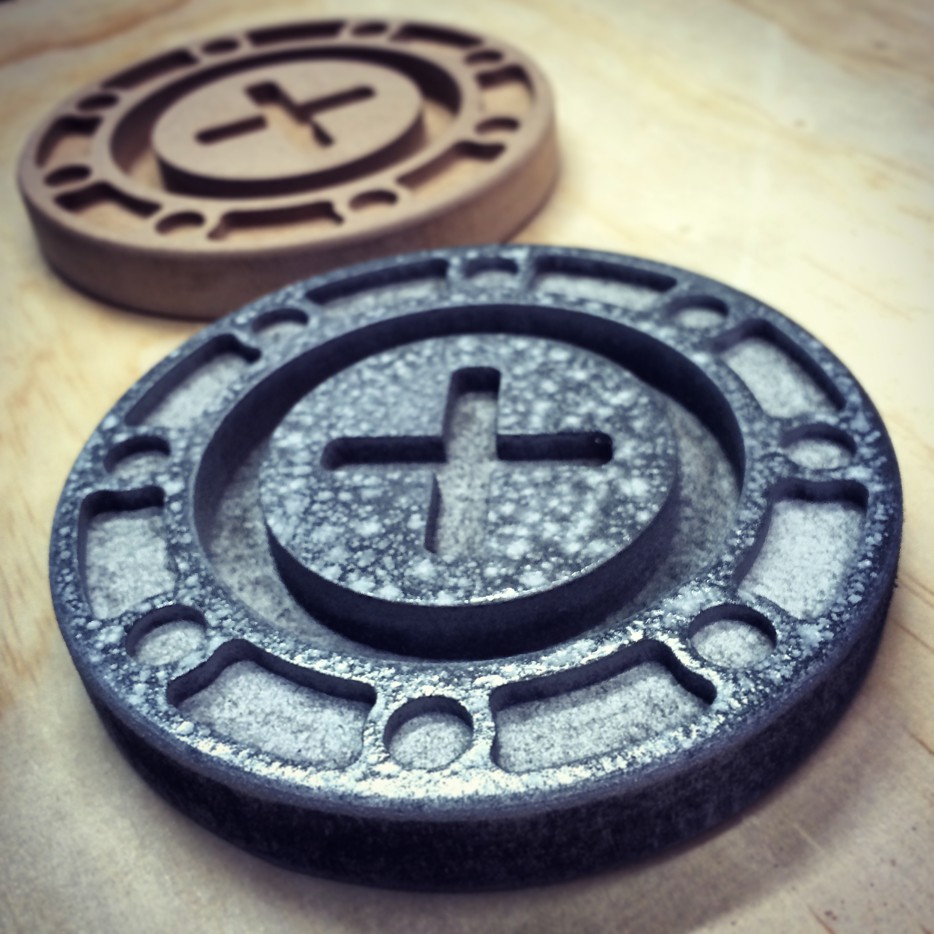
i repeated the file and again got a flawless cut.
i had a little "router jitter" like the router was working a little hard... so i think i might have to change each path-depth to maybe half the depth of the width of my mill...
but i'm psyched to see CNC work!
thanks a bunch for walking me through my issues. :-)
attached is the completed cut, as well as a screen shot of the SHOPBOT SPEED CONTROL windows default values that i had to change.(for reference to future newbies who may find it useful info)
i've been setting the cut rate/speed in the tool edit ONLY.
i've been ignoring the "SHOPBOT SPEED CONTROLS" area...they were set at the defaults.
I assumed those only applied to positioning the XYZ and not actually the cutting speed.
so each attempt to fix the problem was in vain. I thought the problem was in my vcarve project.
on a frustrated whim i popped all those settings down to .5 and tried it again.... SUCCESS... slow.... but SUCCESS!
So your input was right but i wasn't translating it right.
i repeated the file and again got a flawless cut.
i had a little "router jitter" like the router was working a little hard... so i think i might have to change each path-depth to maybe half the depth of the width of my mill...
but i'm psyched to see CNC work!
thanks a bunch for walking me through my issues. :-)
attached is the completed cut, as well as a screen shot of the SHOPBOT SPEED CONTROL windows default values that i had to change.(for reference to future newbies who may find it useful info)
|
Re: Cut doesn't match preview - What am i doing wrong?? September 10, 2014 11:50AM | Posts: 19 |
Very nice results! I prefer to change cutting speeds in the ShopBot editor. There is an icon on the Desktop allows you to open up the *.sbp file. It is kind of fun to look at all the numbers. It reminds me of decoding secret messages.
MS, according to the Command Reference, is movement speed in the x, y direction if you use only two numbers. For example:
MS,0.2,0.2
MZ is the movement speed for up/down (z-direction), etc.
MS, according to the Command Reference, is movement speed in the x, y direction if you use only two numbers. For example:
MS,0.2,0.2
MZ is the movement speed for up/down (z-direction), etc.
|
Re: Cut doesn't match preview - What am i doing wrong?? September 10, 2014 12:18PM | Posts: 453 |
On the one hand I am SO glad you got a good cut, that first successful cut is so important to seeing what can be done and building confidence.
On the other hand, I am concerned as if I read right you are not having appropriate response from the tool database?
This is important to sort out as I will save the same physical tool as several different tools in the db so as to have different speeds, depths, and overlaps for different materials.
On the other hand, I am concerned as if I read right you are not having appropriate response from the tool database?
This is important to sort out as I will save the same physical tool as several different tools in the db so as to have different speeds, depths, and overlaps for different materials.
|
Re: Cut doesn't match preview - What am i doing wrong?? November 21, 2014 02:54PM | Admin Posts: 71 |
Sorry, only registered users may post in this forum.