Cake-bot
by Brian Owen • February 29, 2016 • Handibot Labs
On the eve of the release of a brand new version of the Handibot, I’d like to take some time to think about where we’ve been and where we’re going. Handibot’s Adventure Edition (as we’ve decided to call the version 2.0) has been a massive undertaking in tool design, production methodology, and software design. The work has taken up the majority of the past year; including moving our offices to a brand new building to have more space to expand our shop.
The basic tool itself hasn’t been the only thing we’ve been thinking about all year long though. We’ve been trying to dream up new ideas for how the tool can be adapted to the different types of work that our customers want to do. Brief design “sprints” to create accessories were a way of keeping our minds fresh and sharp—coming up for air from the submersion we had experienced in all things related to the new tool.
I’ve been wanting to share some of these little sketches with everyone—but have also not wanted to worry people about our commitment to getting the new version of the tool out. I can imagine people thinking “What are they doing decorating a cupcake with a handibot!?”
With that said—now that we’re about to begin shipping the new tool I think it’s time to revive the “Handibot Labs” section of the blog with a few tweaks to the concept…We see Handibot as a platform for creativity. We try to spend part of each week thinking up and trying out new uses for the tool. Sometimes these ideas become products and sometimes they don’t but we want to keep everyone informed about things that we’re tinkering with. Even if one of our ideas doesn’t become a product—that doesn’t mean that you can’t make it one! We base these decisions on what our customers are asking for—so stay involved on the forum and the blog and one of us will surely pop in to answer questions or give our thoughts on an idea.
With that said, I’d like to share something that I worked on while I was stuck at home after a brief stay in the hospital (I’m doing just fine now!). There has been loads of work done on methods for squirting substances onto a work area—3D printing, conductive ink, glue…all of these things come with very purpose built machines that are usually only good at squirting a small range of things. Ted and I have been trying to think of a quick and easy way to do this on a handibot using hardware that we already have.
While I was in the hospital I had an MRI done. Part of the process was squirting a few different dyes and chemicals into me while the machine knocked around and took pictures of my insides. I was laying there watching them set everything up and in rolled this expensive looking pump on a cart. Into it the nurse inserted a couple of syringes full of whatever they wanted to squirt into my IV. On the most simple level it was just a box that compressed a syringe using a linear drive that I assume is very much like the drive motors on a handibot (I’ll bet our motors are even better!)
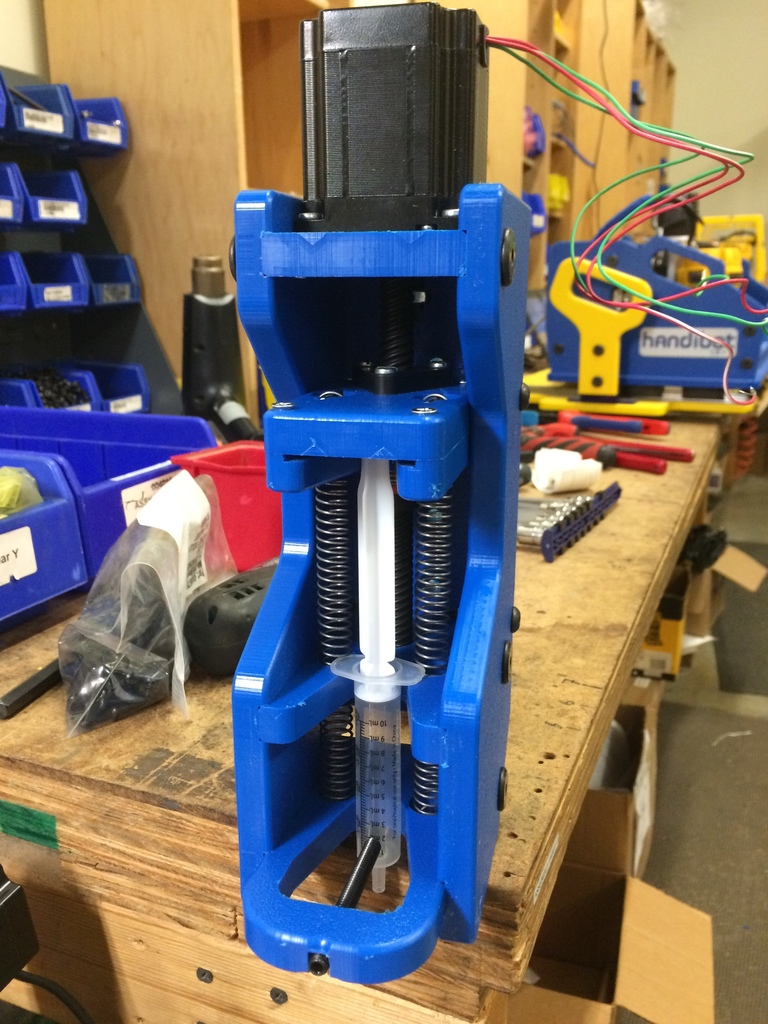
So I took a Handibot Z-motor and built a little plastic frame around it that could hold any size syringe. I spring loaded the plunger so that the motor wasn’t actually compressing the syringe but instead just controlling its downward motion. After testing it out a few times I attached it to a prototype handibot, connecting the motor to the fourth axis driver (comes standard installed on the new handibot).
Now I just needed something to squirt! I dug around in my pantry and found a box of cupcake mix, some vanilla icing and some red food coloring. I baked a dozen cupcakes and mixed up some nice pink icing. Burying the syringe in the bowl of icing, I pulled the plunger back and drew 100cc of icing into the tube. I then popped the syringe into my handibot, placed the cupcake under the tool and hit “go”. The syringe immediately ejected all of the icing all over the table and stabbed a hole through my cupcake…
After some more tweaking and about 9 ruined cupcakes I figured out a good method for icing that involved a little purge at the beginning, a towel to clean the tip of the syringe and a nice smooth spiral over the cupcake. Here’s a video of my eventual successful icing attempt.
I’m going to try to keep updating this section of the blog with things we’re thinking about. I can’t promise it’ll be every week because sometimes production and shipping of tools needs to take priority. But please give me your feedback; it’ll make it fun to continue this process and hopefully help me figure out what everyone wants! Thanks to everyone for your support so far, I’m looking forward to getting the new tool out into the world!